Posted in Thursday Tip

#ThursdayTip: How To Embed A Tweet On Your Blog

Welcome to this week’s social media quick tip.  This week I want to show you how to embed a Tweet on your website or blog. 

1. Select a Tweet to embed on your site. Click on the down arrow icon (v).

e55892ed-56f9-41fb-86b1-2519eaddbe51

2.  Select Embed Tweet from the drop-down list.

bd659313-8a37-4471-ae2c-7919deaff8fa

3. Now simply and paste the code provided into your blog or website.

download - 2019-10-10T104924.612

An embedded Tweet includes the Tweet itself, any media contents (photos, video) so if you don’t wish to include these, go to Customization Options and check “Hide Conversation.”

dc544f8b-5627-4293-af28-8d739406df86


Here you also have the option of translating your embedded Tweet into another language and selecting the colour you would like it to appear as on your website or blog.

Here’s to your Twitter success!


Posted in #HCSM, Thursday Tip

#ThursdayTip: How To Check Your Wall Posting Preferences on Facebook

Welcome to this week’s social media tip. Today I want you to show you how to set your wall posting preferences on Facebook. 

Recently I was teaching a social media workshop when the topic of how to deal with people posting directly to a Family Practice Facebook page came up.  The person who raised the topic hadn’t realised that it’s possible to limit who can post to your Page. In fact, you can set your page’s Posting Ability tab so that only your page admins can post to your Facebook page.

Here’s how to do it.

1. Choose Settings from your Admin panel. Then choose Edit.

download - 2019-11-28T153942.983

2.  From here, edit the posting ability to decide if you want everyone to be able to post on your page, or if you want to allow only your page admins to post by checking the relevant boxes.

download - 2019-11-28T154554.830

3. When you’re done, hit Save Changes.

A very simple step, and one that those who are new to Facebook can easily overlook.

Here’s to your social media success!


Posted in #HCSM, Thursday Tip

#ThursdayTip: How To Create Facebook Collections With Saved Content

Welcome to this week’s social media tip. Today I want you to show you how to use Facebook Collections to curate and organize saved content for easy access and sharing.

Ever come across a piece of content on Facebook but don’t have time to read it in the moment? Did you know you can save that content to view later?  Facebook lets you save content (posts, events, pages, and photos) directly from your news feed and then easily access your saved items from the left navigation menu on the home page.

c52f1658-cac0-40eb-ac33-ef155d619dbd

Here’s how to do it.

To save content to your saved item list, simply click the three dots at the top right of any Facebook post in your news feed, and then simply select the option to save the content.

download - 2019-12-05T082106.892 When you start building a group of saved posts, you can start to organize it into collections, categorizing it by topic.

To create a collection, simply click on Create Collection in the left sidebar.  You’ll then be prompted to name your collection.

e15bd512-52b9-4c51-be29-91d1799482c1

If you want to add a saved post to a collection, simply click the Add to Collection button below the item in your saved list – or create a new collection.

download - 2019-12-05T082916.255

You can also share a saved item directly from your list by clicking the Share button.

download - 2019-12-05T083146.196

I find the ability to save content on Facebook and categorize it according to collections a very useful feature.  I like to share a #MondayMotivation quote each week and many times scrolling through Facebook I’ll find the perfect quote to save. Come Monday all I have to do is access my folder containing quotes to share one quickly and easily with my followers.

Here’s to your social media success!

Posted in Thursday Tip

#ThursdayTip: Deciding on a Facebook Page Vs a Facebook Group For Your Healthcare Business

Welcome to this week’s social media quick tip.  This week I want to show you how to choose whether a Facebook  Page or a Facebook Group is better for your healthcare business.  

In her post, which sets out to provide the definitive answer to the question of Pages vs Groups, Andrea Vahl  describes the difference as follows:

When you post something on your Page, people see that post in their News Feed as coming from your Page.  Then your Page can also participate in the comment section of the post.  In Groups, you are participating as a personal profile with the Group name also mentioned in the discussion.

4 Reasons To Create A Facebook Page For Your Healthcare Business

Vahl outlines the following 4 reasons in her post.

  1. Facebook Pages have built-in analytics.  You can measure what is working.
  2. You can advertise via Facebook Pages.
  3. Facebook Pages are more branded as your business.  Groups facilitate discussion but you are participating as your profile.
  4. Facebook Pages allow the installation of Apps that can help you collect e-mail addresses and leads or do things like run contests.

When Should You Use Facebook Groups?

The number #1 reason from a visibility viewpoint to use Facebook’s  Groups feature is that you will be much more visible in the  News Feed.  At the start of 2018, Facebook announced major changes to the Facebook news feed which meant that people see fewer posts from Pages. It appears that Groups aren’t taking the hit that Pages are in the news feed, so using them in tandem with your Page is a good strategy to increase visibility.

Vahl explains, that “Groups can have higher organic growth rate than Pages because of the fact that they are more visible. For a Page to grow organically, you do need to invest time in adding great content and possibly promoting it with ads.”

A Facebook Group is a natural fit for healthcare as it facilitates a stronger sense of community and conversation. However, this can be a disadvantage if you don’t have the time to moderate these discussions.

So, as always factor in the time you will have to engage with Group discussions.

Over to you

Do you use Facebook Pages or Groups in your healthcare communication? Or a combination of both? What have you found works best for you?


You might also like to read 10 Tips To Create More Engaging Content For Your Facebook Page

Posted in #HCSM, Thursday Tip

#ThursdayTip: How To Assign Admin Roles on Facebook

Welcome to this week’s social media tip. Today I want you to show you how to assign admin roles on your Facebook Page. 

Facebook allows five different administrator roles: admin, editor, moderator, advertiser and insights analyst. Each role has different capabilities.

27405598-3f14-4948-9887-fe65bb311b81

Admin can manage all aspects of the Page. They can publish and send Messenger messages as the Page, respond to and delete comments on the Page, post from Instagram to Facebook, create ads, see who created a post or comment, view insights, and assign Page roles. If an Instagram account is connected to the Page, they can respond to and delete comments, send Direct messages, sync business contact info and create ads.

Editor can publish content and send Messenger messages as the Page, respond to and delete comments on the Page, create ads, see who created a post or comment, post from Instagram to Facebook, and view insights. If an Instagram account is connected to the Page, they can respond to and delete comments, send Direct messages, sync business contact info and create ads.

Moderator can send Messenger messages as the Page, respond to and delete comments on the Page, create ads, see who created a post or comment, and view insights. If an Instagram account is connected to the Page, they can respond to Instagram comments, send Direct messages and create ads.

Advertiser can create ads, see who created a post or comment, and view insights. If an Instagram account is connected to the Page, they can create ads.

Analyst can create ads, see who created a post or comment, and view insights. If an Instagram account is connected to the Page, they can create ads.

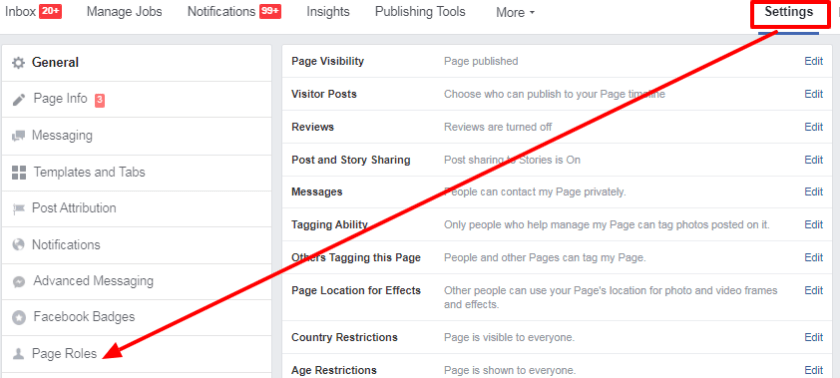
To assign a role go to Settings on your Page, and click on Page Roles. Scroll down through the options above to choose which roles you wish to assign to your team members.

1693526a-0455-4aa9-baa9-c9bc64d55a5b

Here’s to your social media success!