Posted in Thursday Tip

#ThursdayTip: How To Create Graphics With Canva

Welcome to this week’s social media quick tip.  This week I want to show you how to create great graphics with Canva. 

Canva is one of my every-day go-to tools when I am creating visuals. It’s so easy and quick to use it with a multitude of layout options, fonts, images and illustrations to choose from. And best of all it’s free! If you want more advanced features, you do also have the option to upgrade for a small fee.

Whether you want a Twitter post or Facebook profile picture, you can create them quickly using Canva’s drag and drop editor. Select from a number of pre-set designs, or create something from scratch. You can also add elements such as custom icons, fonts, charts, and illustrations.

Here’s how to use it

i. Sign up at canva.com. The sign-up process is quick and easy.

ii. Next click on “Create a design” and choose the platform for which you wish to create a visual, for example, blog, Facebook, Twitter, etc. Your image will be automatically resized to fit the size dimensions of each platform.

canva

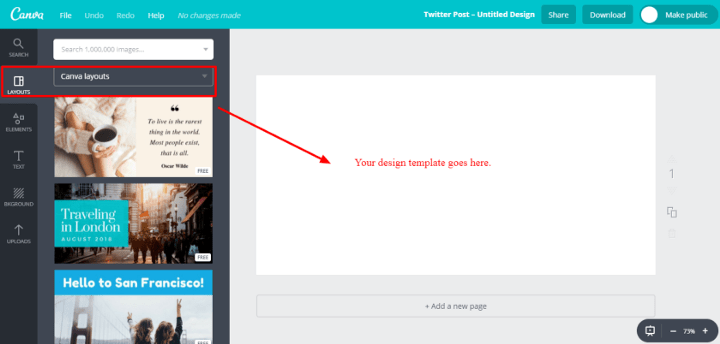
iii. Click on “Layouts” to select a layout for your graphic. There are tons of layouts to choose from. When you find one you like, click on it and it will automatically populate the blank screen for you to work with. You can change out the design at any time by clicking into another layout template.

canvaq

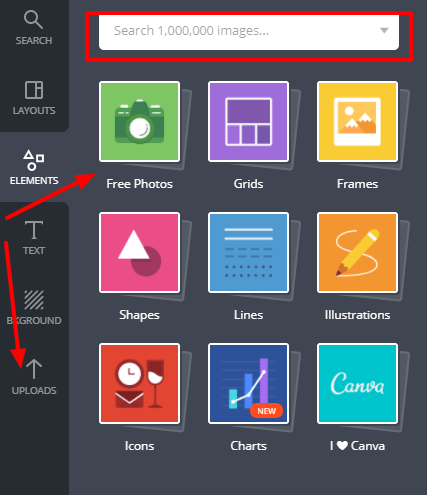
iv. To add an image, select “Elements” which allows you to choose from a variety of shapes, illustrations, and photos from the royalty-free library. Note that not all images are free, some are priced at $1 each. You can also upload your own images to use.

canvaa

v. To add text, click on “Text” and simply drag and drop your heading, subheading and body text. You can also choose from some pre-designed fonts, most of which are free.

can

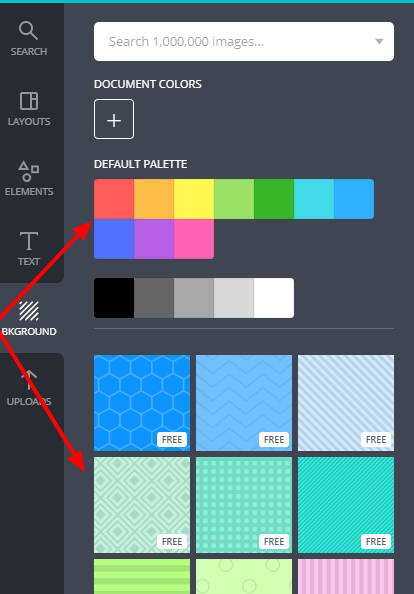
vi. Selecting “Background” allows you to choose different background colours and textures.

backgr

vii. When you’re happy with your design, you have the option to embed it or share it from Canva straight to a social media platform, share a link for others to see the design or edit it if you wish. You can also download it to your computer in jpeg, png, or pdf format.

0_NsY6M3f9nRKMgZ5P

That’s it. You’re all set to create customised graphics for your marketing.

Here’s to your social media success!


Posted in #HCSM, Thursday Tip

#ThursdayTip: How To Create Content With Emotional Resonance

Welcome to this week’s social media tip. Today I want you to think about how you can create emotional resonance through your content marketing.

The word “emotion” is a combination of the prefix e-, meaning “away,” and the Latin word movere, meaning “to move.” In this sense, emotions break us away from our standstills, moving us in new directions and prompting us to take action.

Numerous studies have found emotional arousal plays a key role in driving social sharing. In 2012, researchers Jonah Berger and Katherine Milkman published research based on an analysis of 7,000 articles from the New York Times to see which types of articles were most shared by email.

1_z9Gy_P_eVc44TVx_0QKXVA

The results indicate that virality is partially driven by physiological arousal.

“Content that evokes high-arousal positive (awe) or negative (anger or anxiety) emotions is more viral. Content that evokes low-arousal, or deactivating, emotions (e.g., sadness) is less viral.” — What Makes Online Content Viral?

The Harvard Business Review released research in 2016 which showed that creating a powerful emotional experience increases the chances of going viral. The research, based on an analysis by Frac.tl of the top 100 images of the year from imgur.com, as voted on Reddit.com, found:

  • A significant correlation between content views and positive feelings (specifically joy, interest, anticipation, and trust).
  • Negative emotions were less commonly found in highly viral content than positive emotions, but viral success was still possible when negative emotion also evoked anticipation and surprise.
  • The emotion of admiration was very commonly found in highly shared content, an unexpected result.
1_kBhD0w1ocN5rogIlHR76CA
Heatmap of the aggregate emotional data, representing the totals compiled (HBR)

One way to create emotional resonance is to tell a heartwarming story.

Effective stories inspire people by creating human connection and emotional resonance. In 2015, an article about a husband and wife celebrating 82 years of marriage, topped USA Today’s most shared content. Not only was the story uplifting and inspirational, but it also shared insights on reaching over 100 years of age (if you’re interested — the couple describes a healthy diet and frequent naps as the secret to growing old).

1_LbgwswX5Q6kztsl7kP6Oww.jpeg

Marie Yoland Eveillard speaks with her father Duranord Veillard, who will celebrate his 108th birthday on Saturday, and mother Jeanne Veillard, who turns 105 in May. The couple got married in Haiti in 1932. Tania Savayan/The Journal News

Once you understand how to strike the right emotional chords with your message, you can greatly increase your chance of getting your content widely shared.

Here’s to your social media success!


Posted in Thursday Tip

#ThursdayTip: How To Create An Animated Image For Social Media

Welcome to this week’s social media quick tip.  This week I want to show you how to add variety to your social media posts with an animated image.  

We are going to use Canva to create our animated image. If you aren’t already using this tool, I highly recommend you add it to your social media toolkit. 

Click here for a step by step guide to using Canva.

It’s super quick and easy to do as you can see from the video instructions below.

Note: This is a Pro Canva feature.

You can also access a range of social media templates with built-in animations. They’re fully customizable so you can add even more animation or change any element to make them your own
Posted in #HCSM, Thursday Tip

#ThursdayTip: How To Create Facebook Collections With Saved Content

Welcome to this week’s social media tip. Today I want you to show you how to use Facebook Collections to curate and organize saved content for easy access and sharing.

Ever come across a piece of content on Facebook but don’t have time to read it in the moment? Did you know you can save that content to view later?  Facebook lets you save content (posts, events, pages, and photos) directly from your news feed and then easily access your saved items from the left navigation menu on the home page.

c52f1658-cac0-40eb-ac33-ef155d619dbd

Here’s how to do it.

To save content to your saved item list, simply click the three dots at the top right of any Facebook post in your news feed, and then simply select the option to save the content.

download - 2019-12-05T082106.892 When you start building a group of saved posts, you can start to organize it into collections, categorizing it by topic.

To create a collection, simply click on Create Collection in the left sidebar.  You’ll then be prompted to name your collection.

e15bd512-52b9-4c51-be29-91d1799482c1

If you want to add a saved post to a collection, simply click the Add to Collection button below the item in your saved list – or create a new collection.

download - 2019-12-05T082916.255

You can also share a saved item directly from your list by clicking the Share button.

download - 2019-12-05T083146.196

I find the ability to save content on Facebook and categorize it according to collections a very useful feature.  I like to share a #MondayMotivation quote each week and many times scrolling through Facebook I’ll find the perfect quote to save. Come Monday all I have to do is access my folder containing quotes to share one quickly and easily with my followers.

Here’s to your social media success!

Posted in Thursday Tip

#ThursdayTip: Deciding on a Facebook Page Vs a Facebook Group For Your Healthcare Business

Welcome to this week’s social media quick tip.  This week I want to show you how to choose whether a Facebook  Page or a Facebook Group is better for your healthcare business.  

In her post, which sets out to provide the definitive answer to the question of Pages vs Groups, Andrea Vahl  describes the difference as follows:

When you post something on your Page, people see that post in their News Feed as coming from your Page.  Then your Page can also participate in the comment section of the post.  In Groups, you are participating as a personal profile with the Group name also mentioned in the discussion.

4 Reasons To Create A Facebook Page For Your Healthcare Business

Vahl outlines the following 4 reasons in her post.

  1. Facebook Pages have built-in analytics.  You can measure what is working.
  2. You can advertise via Facebook Pages.
  3. Facebook Pages are more branded as your business.  Groups facilitate discussion but you are participating as your profile.
  4. Facebook Pages allow the installation of Apps that can help you collect e-mail addresses and leads or do things like run contests.

When Should You Use Facebook Groups?

The number #1 reason from a visibility viewpoint to use Facebook’s  Groups feature is that you will be much more visible in the  News Feed.  At the start of 2018, Facebook announced major changes to the Facebook news feed which meant that people see fewer posts from Pages. It appears that Groups aren’t taking the hit that Pages are in the news feed, so using them in tandem with your Page is a good strategy to increase visibility.

Vahl explains, that “Groups can have higher organic growth rate than Pages because of the fact that they are more visible. For a Page to grow organically, you do need to invest time in adding great content and possibly promoting it with ads.”

A Facebook Group is a natural fit for healthcare as it facilitates a stronger sense of community and conversation. However, this can be a disadvantage if you don’t have the time to moderate these discussions.

So, as always factor in the time you will have to engage with Group discussions.

Over to you

Do you use Facebook Pages or Groups in your healthcare communication? Or a combination of both? What have you found works best for you?


You might also like to read 10 Tips To Create More Engaging Content For Your Facebook Page

Posted in Thursday Tip

#ThursdayTip: How To Snoop On Your Competitors on Facebook

Welcome to this week’s social media quick tip.  This week I want to show you how you can find out which kinds of ads your industry peers and competitors are running on their Facebook pages. 

In an effort to increase accountability and transparency of Pages, Facebook is showing more information about Pages and the people who manage them in the Page Transparency section on Pages, which formerly appeared on the Info and Ads tab.

This gives you the ability to see which kinds of ads a Page is running, which can provide a useful comparator for your own social media marketing.

Here’s how to works

In this example, I’m going to check out the Mayo Clinic’s Facebook Page.

5b9518ef-181e-4971-8115-1504312296cd

To access this information as a page visitor, visit any Page’s Timeline, scroll down to the Page Transparency below the About section and tap See More. 


13a95aab-bb96-4d4a-8350-9232c42eee8a

Now you can scroll through the ads currently running and in which countries (note you can’t see how the ads are doing in terms of engagement).

c33d4e3b-d3c3-44a6-8112-736179784d3a

Why this feature is useful to your social media marketing

This kind of competitive analysis can be helpful to you to improve your own Facebook advertising. I’m not saying you should copy the ad creative, but you can certainly use it as inspiration for your own campaigns. Using this feature you can gain valuable insights into the kinds of images, headlines and call-to-actions that successful industry players are employing.

Here’s to your social media success!


Posted in Thursday Tip

#ThursdayTip: How To Upload Documents To LinkedIN

Welcome to this week’s social media quick tip.  This week I want to show you how to upload documents to share on LinkedIn.

Did you know that you can now share your presentation slides, research papers, industry reports, and more directly to LinkedIn?

6bfcb6f4-09dc-4790-b27a-7cf03969162e

How to share a document

Click on the documents item on your desktop feed.

download - 2019-09-23T121344.909

Choose a document from your computer or upload one from the cloud.


f52ca817-cfa6-4bfe-8243-e2d7c4c3d43f

Give your document a name. Below I’m sharing my Speaker Sheet.

72fd77fa-f223-4054-9fe3-19b7a651e752

Once you’ve uploaded your document, you can provide more information and add a relevant hashtag before you hit POST.

e236b4fd-b2f7-4075-8d37-9d7118010fec

Uploading documents to your feed, in a group, or on your LinkedIn page is a great way to share what you know with your community.

After you post a document, your followers can download it, embed it, and reshare it. You’ll also be able to see the analytics on how people did one of those actions.

622d2a42-7738-4854-aef9-0a0776ce33c3


Have you availed of this feature yet? Do you think it’s a useful LinkedIn feature?


Posted in Thursday Tip

#ThursdayTip: How To Create Live Videos on Twitter

Welcome to this week’s social media quick tip.  This week I want to show you how to create live videos on Twitter.

With the announcement of its new live-streaming option, which will enable users to add audio-only guests into their streams, I thought it might be helpful to go through the steps needed to create live videos on Twitter. I’ve also included  instructions on how to add a guest to your broadcast and how to share your video with followers.

How to start a live video

  1. Swipe left from the home timeline or tap from the composer.
  2. Tap the live mode at the bottom selector.
  3. To go live with audio but not video, tap the microphone at the top right. This will turn off the camera, and you’ll be heard by viewers, but not seen.
  4. Fill in an optional description that will appear as a Tweet, and a location if desired. Then press Go live.
  5. Your live broadcast, with description and location (if added), will appear in a Tweet in your follower’s timeline and on your profile.

How to end a live video

You can end a live video at any time by pressing the Stop button on the top left and confirming your action in the menu that comes up. Your live videos will automatically be posted as a Tweet when you go live. You can also save your live video right to your device’s camera roll at the end of your live video by tapping Save to camera roll.

How to add a guest to live video

D7v4yilXYAIbAxQ

When enabled, viewers of the live broadcast can request to join as a guest. Up to 3 guests can participate in a live broadcast at one time. Broadcasters can choose to turn off the camera, and participate as audio only. Guests will participate with audio, and can be heard by all viewers.


To start a live broadcast with guests:

  1. Open the camera by swiping left from your timeline.
  2. Tap the Live mode at the bottom.
  3. To allow live viewers to request to join your broadcast, tap the icon on the upper right.
  4. Tap Go LIVE to begin your broadcast.
  5. When a viewer has asked to join your broadcast, a notification will appear in the chat. You can also view the call-in list by tapping the icon on the bottom bar and see every viewer who has requested to join the broadcast.
  6. Tap the ± to add them to the broadcast. There will be a 5 second countdown before they join.
  7. To remove a guest from the broadcast, tap the X on the top right of their avatar.

To join a live broadcast as a guest

  1. While watching a live broadcast that has guests enabled, tap the icon, then tap Ask to join.
  2. The broadcaster must approve your request to join as a guest.
  3. Once accepted, a 5-second countdown will appear onscreen before you are added to the broadcast. If you choose not to join, tap Cancel.
  4. Your audio will be heard by all viewers of the broadcast.

To leave the broadcast as a guest

To exit the live broadcast as a guest, tap on the icon on the bottom, and select Hang up, or simply tap the X at the top left of the screen. When you leave the broadcast as a guest, you can continue to watch the live broadcast as a viewer.

How to share a live broadcast or replay

Your live video can go anywhere that a Tweet can go. This means that it’ll be searchable in the Twitter app, on the Twitter website, and it can be embedded on other websites just like any other Tweet. It will also exist and be searchable on Periscope, which powers live videos on Twitter.

From the live video or replay full-screen mode, click or tap the share icon then choose between the following options:

  1. Click or tap Share Live (when live) or Share From Beginning (when in replay mode) to Tweet, Direct Message, or copy the link of a full live video or replay from the beginning.
  2. Click or tap Share from… to Tweet, Direct Message, or copy the link of a live video or replay starting at a point chosen using the selection bar.

How to edit your videos

In the Twitter for iOS and Android apps, you can change the title, thumbnail image, and set a custom starting point after ending a broadcast. To get started, tap on the broadcast you’d like to edit. Tap on the overflow menu, then tap the Edit Broadcast option. Once you make your changes you’ll be prompted to save.

Keep in mind that broadcast titles can only be edited up to three times. Additionally, it will take up to 15 minutes for edits to appear in Twitter, and up to a minute for them to appear in Periscope.

Here’s to your social media success!

Posted in #HCSM, Thursday Tip

#ThursdayTip: How To Assign Admin Roles on Facebook

Welcome to this week’s social media tip. Today I want you to show you how to assign admin roles on your Facebook Page. 

Facebook allows five different administrator roles: admin, editor, moderator, advertiser and insights analyst. Each role has different capabilities.

27405598-3f14-4948-9887-fe65bb311b81

Admin can manage all aspects of the Page. They can publish and send Messenger messages as the Page, respond to and delete comments on the Page, post from Instagram to Facebook, create ads, see who created a post or comment, view insights, and assign Page roles. If an Instagram account is connected to the Page, they can respond to and delete comments, send Direct messages, sync business contact info and create ads.

Editor can publish content and send Messenger messages as the Page, respond to and delete comments on the Page, create ads, see who created a post or comment, post from Instagram to Facebook, and view insights. If an Instagram account is connected to the Page, they can respond to and delete comments, send Direct messages, sync business contact info and create ads.

Moderator can send Messenger messages as the Page, respond to and delete comments on the Page, create ads, see who created a post or comment, and view insights. If an Instagram account is connected to the Page, they can respond to Instagram comments, send Direct messages and create ads.

Advertiser can create ads, see who created a post or comment, and view insights. If an Instagram account is connected to the Page, they can create ads.

Analyst can create ads, see who created a post or comment, and view insights. If an Instagram account is connected to the Page, they can create ads.

To assign a role go to Settings on your Page, and click on Page Roles. Scroll down through the options above to choose which roles you wish to assign to your team members.

1693526a-0455-4aa9-baa9-c9bc64d55a5b

Here’s to your social media success!

Posted in Thursday Tip

#ThursdayTip: How To Analyze What’s Working For Your Competitors

Welcome to this week’s social media quick tip.  This week I want to show you how to analyze what’s working for your competitors and industry peers.

Your competitors and industry peers are valuable sources of insight. Look at the type of content your competitors are creating. Identify which content is performing well for them in terms of social shares, comments, likes, etc. Now, brainstorm around how you can take a piece of content they have created and put your own unique twist on it.

How to do this

Facebook provides an excellent feature to help you “spy” on your competitors with its Pages to Watch feature. To access Pages to Watch, go to your Facebook Page Insights and scroll down to the bottom of the Overview tab.

download - 2019-08-29T104536.596

Here’s to your social media success!